All grains contain peptides that mimic morphine or endogenous opioid substances. This is where I deal with my latest loaf craving. Get your bread-based exorphin fix here.

Showing posts with label sourdough starter. Show all posts

Sunday, June 12, 2011

Fold-free Tartine-style 100% Whole Wheat Bread

 100% Whole Wheat Tartine-Style Loaf,
using a long bulk fermentation without folds

Because the last bread I made had yucky flour, I had very little whole grain bread to eat, and had to make some in a hurry. And since I had been told I was not going to be around most of today, I didn't think I'd be able to bake any bread. I decided to not let that stop me: I elected to make a Tartine-style bread, but with some changes.


The changes:
1) I would make the bread with sourdough starter (discard) rather than leaven. I've done this before, so I knew it would work, and I also knew that I wouldn't mind the extra sour taste that the bread has if you do this. It might not be as good as making it from younger fresher leaven, but it would work. And since I'd be the one eating it, I wouldn't worry too much about what others thought.
2) I would make it with 100% ww starter, and 100% whole wheat: I've done this before too, a couple of times, already.
3) I wouldn't be around to do the many folds on the bulk fermenting dough. This made me curious: how important are those folds, anyway?

But the most important reason I was going to make a Tartine-style bread and not a yeasted bread was, I was going to try and remember to do the bench rest, a stage in the Tartine Bread process that for some reason I kept forgetting.


So just before leaving for the day, I refreshed the sourdough and mixed up the Tartine-style 100% whole wheat dough. I would let it sit out on the counter, without folding, for about 7 hours before I could get back to it.


At that point, I divided it, bench rested it, formed it, and let it sit another 3 hours before baking.

Results
The bread rose dutifully. The first loaf looks better, the second loaf deflated a bit from falling too hard into the hot casserole dish. The oven spring was such that it very nearly came up to the original height.

Because I didn't do the folds, and the dough was a bit overproofed, it felt a bit slimier, slightly less resilient. The gluten was starting to break down, it wasn't as stretchy as it usually is.


But the bread counts as a success because I now have bread to eat again, and I remembered to do the bench rest. I'll certainly need a bit more practice to feel comfortable with the gentle push-pull of pre-shaping, though.

I cracked into one of these loaves while it was still warm, and was pleased to find that the crumb was almost as nice as the other 100% whole wheat Tartine-style breads I've made when I've been home to fold the dough every 30 minutes. Furthermore, the taste of the bread is not too sour. This could be because, instead of using 200g of leaven, I only used 195g of starter; or it could be because the starter was fairly new (I'm still refreshing it daily, and trying to use it up by making muffins or english muffins, or pizza, or anything else that comes to mind), or because it was more than 100% hydrated (I don't measure the hydration of the starter accurately; following the Tartine method, you don't really have to, you just have to aim for a batter consistency).

The second loaf was still fresh a couple of days later when I sliced into it for some bread to take with me to work:


Notes to Myself

  • In a pinch, you can make a 100% whole wheat Tartine style loaf in a single day. You can even make it without the many folds that the original recipe calls for, during the bulk fermentation. In this case, the bulk fermentation takes twice as long, though. And the dough will not feel as nice, and possibly you might have more difficulty forming it, but an acceptable bread can still be made in this way. If you do it this way, though, expect a more sour taste.
  • While folding the dough, it occurred to me that these envelope-style folds that are so nicely described in pictures in the Tartine Bread book might be able to incorporate something in the middle of the dough, wrapped up. I got this idea from looking at an avocado sitting on my counter: what about a guacamole bread? But anything could be wrapped this way in the middle of the dough: for example, goat cheese. Or dried fruit. Or why not vegetables, like slices of fresh red pepper? The possibilities may not be endless, some ideas may not even be good, but it might be fun to try different things with this.

Friday, December 10, 2010

Rye Bread with Steel Cut Oats


Rye Bread with Steel Cut Oats

This ugly loaf is one of those fast rye breads that I have been throwing together hastily lately just to have something to eat when I go to work. Nothing interesting here. I tossed in the steel cut oats, without any soaking or boiling of them, just to give the dough some extra texture. I used 1/4 cup of them and then sprinkled some on the surface a couple of times.

I let the dough sit out for a couple of hours before adding the salt. Then I kneaded the salt in and let it sit out for about 4 hours before baking.


This is an ugly grey coloured loaf, probably because I am using some very old motherstarter that I should have tossed away. It was old, but it had been refrigerated. I threw out the hooch layer, and just incorporated the old spent rye.

I am very surprised that the resultant loaf is not more sour.

There was one thing different about this loaf. I tried a rye wash, with about 15 minutes left on the 65 minute long bake. It did turn the top of the loaf an unappetizing grey colour.


The wash was boiling water (150g) and rye flour (2 tbsp), stirred for 1 minute and then left to sit for 50 minutes before brushing on the top of the baking loaf. I coated the bread liberally. By then, the scores on the top of the bread had left deep fissures, and I coated them too.


Notes to Myself

Saturday, December 4, 2010

Nils' 60% Rye with Applejuice Soaked Rye Grains Third Attempt

Third try with Nils' 60% Rye with Applejuice Soaked Rye Grains

I was pretty much told by my wife that I had to make this again for my mother-in-law, who is visiting tomorrow.

I dunno, though.  Every time I make it, it turns out just a little bit different.  This time, the boiled rye grains, soaked in our home-made apple-peach-kiwi juice, turned a lovely russet or wine-coloured during the long, 90-minute baking.  I'm hopeful that once again, it tastes just as nice.

This time, it seemed like I was adding quite a bit of salt.  Perhaps the sea salt I'm using is a much finer grain than the other salt I've been using.

Making the bread takes a bit of organization, so that the soaker of boiled grains in apple juice, and the sourdough build of rye flour arrive at the final dough in the correct time.  This time, I once again boiled the grains for a full hour before draining it and putting them in the juice.  Some of the rye kernels popped open nicely, and this leaves one with quite a nice variety of textured grains to add to the bread.  I wonder what other juices (or teas, or wines) one might soak grains in that might provide the most interesting flavours, and pH, and enzymes, for a successful loaf.

 The rye kernels are boiled and drained,
  then juice is poured over them
 Just before adding to the dough, the rye kernels are drained again


But once again, one of the loaves seems quite tiny.  I probably need to add another 10-15% of ingredients to my already-slightly increased amounts.

 Mis en place

 Yeast has a chance to thrive in the high starch of the AP Flour for 30 min


The loaves do not seem to rise all that much while proofing, although they do have a bit of oven spring.  The dough is very wet, and it probably requires this long baking period to ensure that everything is properly baked through.


 Start of Bulk Fermentation

 End of Bulk Fermentation

Because the kitchen was often in use today, I had to take my turn with the oven.  So the time of the bulk fermentation and final fermentation was a bit longer than suggested by the recipe.  But it didn't seem to make all that much difference.  The loaves turned out fine.


Check out the earlier attempts at making this bread:

1st try
2nd try


Here is a look at the crumb of today's baking:

A Fair Trade: I give my mother-in-law a loaf of this bread, 
she gives me some of her Christmas Stollen
Very nice crust, chunky textures

Notes to Myself

  • Julia Child says to lay your loaves on their side when cooling on racks.  I'm trying that here.
  • Today I was reading more about the potentially cancerous acrylamides, in Skog and Alexander's book.  It turns out that rye breads are implicated in imparting more acrylamides to the diet than wheat (a close second); other grains like oats and corn and rice give substantially less.  A high temperature baking like we have here is bad for adding more acrylamides.  Better is to have long fermentation times, so the yeast can help break down some of the amino acids that are responsible for the dangerous substance.  Another idea that some food producers have tried is to add asparaginase (an enzyme that breaks down asparagine, the amino acid responsible for the creation of acrylamides during the Maillard Reaction when carbohydrates are heated) to the flour.  But it turns out that there is going to be some opposition to this move to put aparaginase into our food (e.g. see "Canadians Against Asparaginase" petition).  I personally am undecided, and feel that there ought to be more science done before we add this to our food (or before we leave it out).  I mean, I am aware that there have been benefits in the past of adding vitamins to our flour: untold millions of people have been spared the problems of Vitamin B deficiency, just by a fairly simple government move to enforce the enrichment of flour.  But there is a big emotional component to those who fear the additive, because asparaginase is also given to patients with Leukemia to fight cancer, and this has some people scared that our food is being drugged.  They also don't like that the source of the enzyme is probably going to be e.coli, a bacteria which can create it.  I for one would like to reduce acrylamides in my diet, but I want to do it safely.  We need to know what the risk of ingesting it is.  We need to know how to reduce the amount we eat.  Unfortunately, this science appears to be still in the early stages.  We may have to make a decision based on guesswork, or wait until we have more proof.
  • Next time you make this bread, add another 15% of ingredients to this 2-loaf recipe; so:
    • What I used this time:
      • Sourdough
        • 300g Rye Flour
        • 250g Water
        • 25g Rye Starter @100% hydration
      • Soaker
        • 250g Rye Grains
        • Boiling Water to Cover
        • Apple Juice to Cover (use what you have, even if it is Apple-Peach-Kiwi)
      • Dough
        • 500g Warm Water
        • 300g Rye Flour
        • 400g All Purpose Flour
        • 25g Sea Salt
        • 3g Yeast
    • What I'll use next time:
      • Sourdough
        • 345g Rye Flour
        • 287g Water
        • 29g Rye Starter @100% hydration
      • Soaker
        • 287g Rye Grains
        • Boiling Water to Cover
        • Apple Juice to Cover (use what you have, even if it is Apple-Peach-Kiwi)
      • Dough
        • 575g Warm Water
        • 345g Rye Flour
        • 460g All Purpose Flour
        • 29g Sea Salt
        • 4g Yeast

Friday, November 19, 2010

A Tale of Two Sourdoughs: Desem, a whole wheat sourdough


Laurel's Kitchen Bread Book's Desem (Whole Wheat Sourdough)

This blog entry completes the 'Tale of Two Sourdoughs' cycle, a comparison of two very different sourdoughs, one made with rye and the other made with wheat.

Part 1: Arva Flour Mill supplies my grain
Part 2: Nils' Schöner's Sourdough Method for rye


This method of whole wheat sourdough creation is one of the strangest I have seen, but the glowing reports of the bread made with it leaves one with such curiosity, I just had to try it. 

Laurel's Kitchen Bread Book (LKBB) has an entire chapter devoted to whole wheat breads, and all other breads in this chapter take up pp 79-108; the desem technique for dough, basic bread and other desem recipes occupy the second half of this chapter, pp 109-133.  Therefore, one can readily see the importance of the Desem bread, even without the many accolades that the book places on the bread's unique taste.

I was making this sourdough at the same time I was making the Rye Sourdough, and I must say that this entire methodology is completely different and utterly strange to me.  But it was fun, too.  Although there are a lot of pictures here, it mostly just shows how the desem develops, over time; it doesn't really show here what it might be capable of.  This page does have a couple of links to the first and second breads I made with it, though.


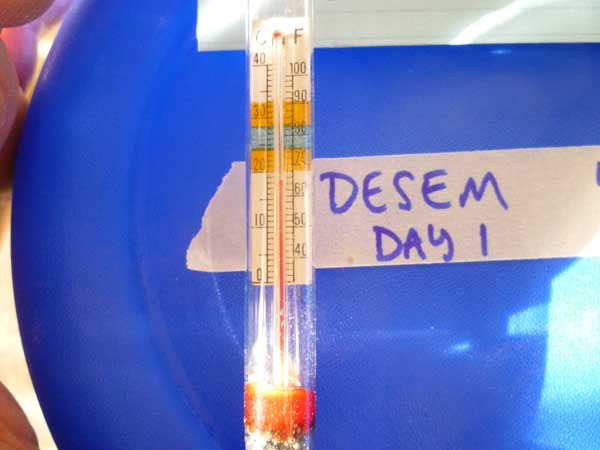
Day 1, I started with 3 c of wheat berries to make 2 c of freshly milled whole wheat flour (292g), and 1/2 c of water (109g).  I kneaded it and rounded it; and I must say that this dough ball is extremely dry and tight, and difficult to knead at this point.  The next part is a bit strange too: this dough ball gets buried in some whole wheat flour, with 4 inches of whole wheat flour on each side, for 48 hours, at a pretty cool temperature.  I found a place in our basement, beneath the fruit cellar jars, that stayed at about 60 degrees F., well within the 50-65 degree F range required.
 I get my wheat berries from Arva Flour Mills
 Several cups of wheat berries to mill
 Into the hopper
 Pour the grains in
 Take off your sweater before you start grinding, you will heat up
 If you milled it too coarsely, you can always run it through the mill again
 Not your average run of the mill grain
 As the miller said, 'That's fine'
 Measure out three cups
 Doesn't look like much yet, but the yeasts are in there
 As soon as you add water, they will start to arouse
 This is still pretty coarse, you have to knead it into shape
 That is one dry piece of coarse dough

 I fill half a tub with whole wheat flour (milled by Arva Flour Mills)
 I pour some of my own freshly milled flour on top
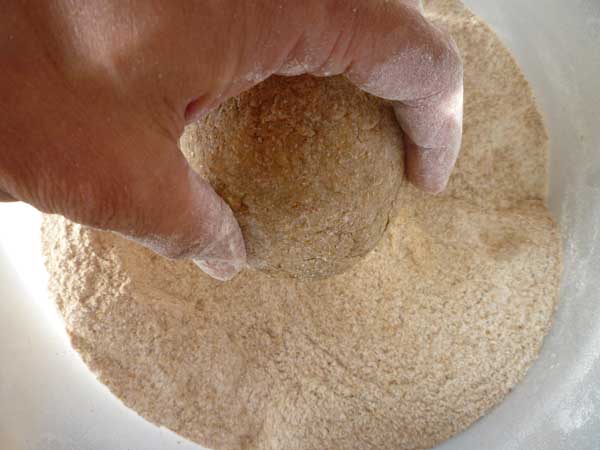
 Place my hard ball of desem in the whole wheat flour
 Cover it with more of my own freshly milled whole wheat flour
 And cover that with more of the whole wheat flour milled at Arva Flour Mills
 This gets covered
And it is kept at a controlled, very cool temperature for a couple of days.

Day 2, just leave it alone, don't touch it.  Maybe make sure the temperature hasn't changed, that's all.
Wait

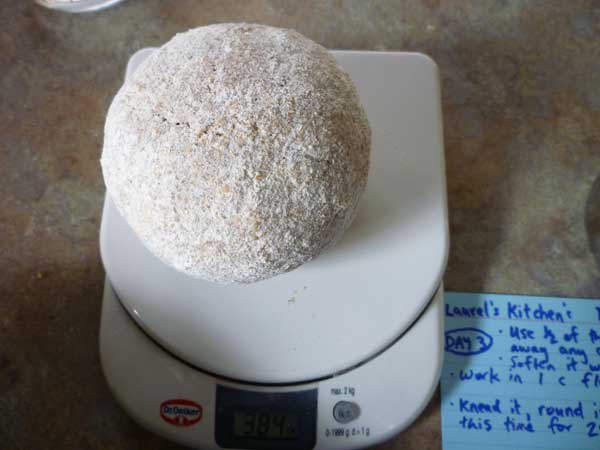
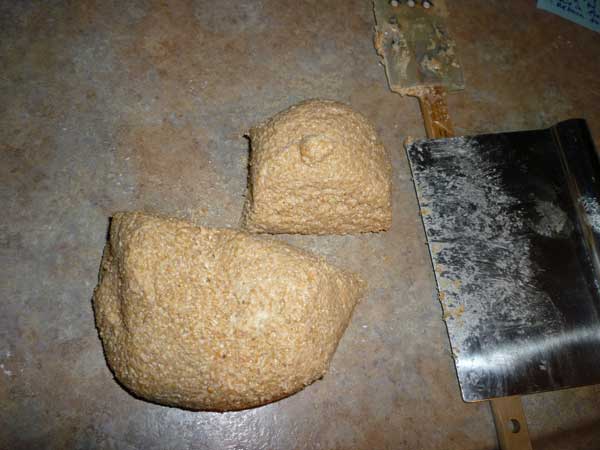
Day 3, take your hard dough ball from where it was buried, and cut away the hardest crust -- and more -- until you have just half of what you started with.  For me, my desem ball weighed in at 384g, so I peeled it like an apple until I had 192g of still fairly hard dough.  To this, I was to add 1 cup of freshly ground whole wheat flour, which I measured out to be 116g; and I added 1/4 c of water, which I measured to be 56g.  Softening the desem ball in the meagre amount of water, I then kneaded the ball and incorporated the whole wheat flour.  The whole thing gets stuck back into the middle of a pail full of whole wheat flour for another day.


 Mill some grain and measure the flour and water


 Find your desem in the middle of the flour barrel and pull it out


 Measure it and peel off the hard crust


 Soften the desem in water


 Add some flour, mix it up, and knead it into a new ball


 Cover it back up in the barrel of whole wheat flour 

and let it sit covered again

Day 4, I repeated what I did on day 3.  This time, I measured my Desem at 350g, so half of that was 175g.  I cup of whole wheat flour today measured to be 122 g, and the water I used was 50g.  But today, the whole dough ball I was kneading seemed a whole lot softer.


 Dig out the desem, weight it, peel it, and keep half


 Moisten it in water, and add more flour


 Mix it, knead it, make another ball with it


 Bury it in flour again
 Cover it and wait

Day 5, you repeat what you did on day 3 and 4.  Here, my desem was 348g.  So today I peeled away the hard crust until I had 174g, and I added the same amounts of whole wheat flour and water that I had the day previously.  Every day, the desem is looser, less hard, less crusty.


 Grind some flour to have it ready, fetch the desem, weigh it


 peel the desem, use half, and add the appropriate amount of flour


 Measure the water, soak the desem, add the flour, mix it, knead it
 Cover it up again in the flour barrel

 Cover it and wait


Day 6.  Now the thing is so sloppy, it gets a bit difficult to get it all out of the container intact.  Now we are to soften the entire mass in 1/3 c of water (67g) and 1 c of whole wheat flour (142g).  And this time, we do not bury it in our whole wheat container, but we are to store it in a closed crock. 

 Measure the flour
 Dig out the sloppy desem
 Put it in the crock
 Add water
 Add flour
 Mix it
 Knead it
 Return it to the closed crock

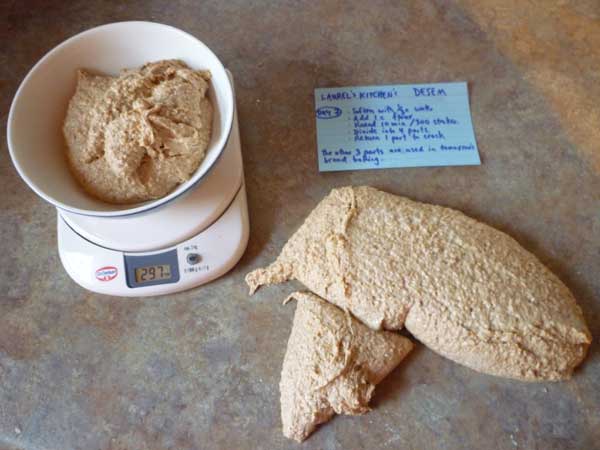
Day 7.  Now things get really interesting.  Again, we soften the whole mass with 1/3 c water (82g) and add 1 c of whole wheat flour (142g).  Then after mixing it, you knead for 10 minutes or 300 strokes.  When I did this, I found it to be very sticky, and I had to put some water on my hand several times.  But when I was done, I measured the mass to be 994g. 

We are told to divide the entire mass into 4 parts and return 1 part to the crock; the other 3 parts will be used in bread baking the next day.   The desem that I returned to the crock weighed 249g.

Now, I had been making this desem each day of my vacation, and by day 7 we were going to head off to a cottage up north for a few days.  I couldn't take my mill with me, so I had to take a few days worth of flour with me -- along with my various desem containers, and books, notes and other bread making paraphernalia.  Who knew what sorts of things the cottage would have, to allow me to make this bread?

 Mill enough for the trip

 Desem seems to like its new home in the crock
 put it in a bowl
 soften in water
 mix it
 knead it


 Measure it and remove 1/4 to reserve as desem

 The 3/4 part will be used to bake with, tomorrow.

 Take all of this stuff with you to the cottage


Day 8.  Okay, we are now into the second week of this desem.  LKBB says that the desem is already viable and can raise dough, although it also says that it won't be particularly strong until the desem gets refreshed several times.  So today, the first day we were at the cottage, I was to do two things: (1) continue building the desem, and (2) bake the first loaves of bread with the desem that I spent the last week building.

(1) Building the desem.  There are several different ways to do this; LKBB suggests that you should bake bread daily with it, this second week, so that you can see the way the sourdough changes its ability to raise the dough.  But this was going to be problematic for me, being so far away from my home kitchen.  I opted instead for one of the alternatives: I would feed the desem (which contains 1 c of flour already) daily with 1/3 c of flour (the last day 1 c), so that by the end of the second week, my desem would have in it 4 c of flour.  Each time I feed it, I was to first soften it in water with an amount of water slightly less than 1/2 the amount of flour, and knead it for 10 minutes.
 1/3 c of water, or slightly less
 soften up the desem in the water

 1/3 c of the flour I milled yesterday


 Mix it
 knead it
crock it

On day 8, I therefore added 49g of whole wheat flour, and 34g of water; LKBB uses volume measures for the desem recipe, not weight measures; so my 1/3 c measure measured my whole wheat, and I eyeballed the water amount by filling up the same measure about half-way.

November Sunrise over Groom Lake near Kearney Ontario: time to bake!
(2) Here is a record of my first desem leavened loaf, baked in the cottage at Kearney Ontario.


Day 9.  Still at Kearney.  Still adding 1/3 c of whole wheat flour, and slightly less than that, by volume, in water, daily.  This is an extremely wet and sticky dough at this stage.  Thinking that this might be because I was adding too much water, I refused to wet my hands this day, as I kneaded.  1/3 c flour is 51g; 1/2 that volume in water is 22g today, by my 'eyeballing method'.


Man that is gooey: wondering if I'm adding too much water
Day 10.  Still at Kearney, but today we are heading home.  Not until I add 1/3 c of whole wheat flour, and half that amount by volume in water.    Flour is 48g, water is 28g.


I do my best to knead this, but it is really overly wet

Day 11.  Home from the cottage, but today I have to go to work.  Before I leave at 0620, I eat breakfast, make lunch, do the three S's, and also, now, feed the desem.  38g of water, 51g of flour.


Still very wet

Day 12.  Work again.  Feed desem again.  31g water, 50g of flour.


Still wet, though I'm trying to be careful not to add too much water

Day 13.  Work again.  Desem gets fed 52g flour, 30g water.


Still wet

Day 14.  Day off.  In anticipation of baking tomorrow, today I feed the desem 1 c of flour.  I am also to add 1/2 c of water, or enough to make it slightly sticky after 10 minutes of kneading.  I have the water ready, but I only wet my hands with it.  I do not need to incorporate it.  The water content of the desem is, and probably has been, too high all this week.   I divide the desem by weight into quarters, and reserve 1/4 for next week's feeding schedule.  The other three quarters I set aside for tomorrow's baking.  


 This time I use no water at all, and the dough comes together without requiring any water


 I save 1/4 of my desem by weight for the crock, to continue feeding daily


3/4 of the desem is set aside from the crock to bake with tomorrow

Day 15.  Another baking day.  That means two things to do again:

(1) Refresh the desem.  As long as you have got some whole wheat flour already milled, this takes very little time.  Am I tired of doing it yet?

No, not really.  But the tasks are quite repetitive.  No point in making more pictures.  Refreshing the desem this week will be much the same as refreshing it last week -- only, hopefully I won't make it too wet this coming week.

What I am tired of is writing about it.  And fighting with the stupid word-processor which continuously insists on changing 'desem' to 'deism'.   It wasn't until I wrote that sentence that, realizing the level of my frustration, I learned how to teach Mac's TextEdit how to learn the word.  Arggh.  That was too easy.

Edit -> Spelling and Grammar -> Show Spelling and Grammar -> Learn
       
(2) Bake my second desem loaf.