All grains contain peptides that mimic morphine or endogenous opioid substances. This is where I deal with my latest loaf craving. Get your bread-based exorphin fix here.

Thursday, September 30, 2010

Adapting Mini's Rye Ratio to my old Starter


Adapting Mini's Rye Ratio to my old starter

I have been wanting to try Mini's Rye Ratios ever since I first saw the posting about her breakthrough discovery of the 'right' ratio for rye on 'The Fresh Loaf Blogs'.


This is not it, but is an adaptation of her recipe to suit the needs of my day.  One day, I will use her recipe with more exactitude.  For now, this will have to do.

For today, I take some old starter (here is where I begin to diverge), at 75% hydration (another divergence) and considered that my weight standard ("one part rye starter").  To this, I added 3.5 parts water, and 4.16 parts flour, and salt at 1.8% of the flour's weight, as per Mini's ratio.

I am also adding someinstant dried yeast, (another divergence) because my starter is old.  I'll go with 1% of the total flour mixture (i.e., the weight in grams that is 1% of the flour's weight added to the part of the weight of the starter that is rye flour. 

I will also made my own bread spice, using the recipe she talks about elsewhere.  Mini uses 4 TBSP of bread spice per 500g flour (that is, 1 TBSP:125g flour).  I will use instead the ratio given in the recipe I found online for Brotgewürz, i.e. 5g per 1000g of flour.


The Bread Spice I Made

The bread spice is based loosely on the German Brotgewürz, a commercial product I have never tried.  Mini gives her own recipe for bread spice elsewhere in the fresh loaf blogs, but that only uses fennel, coriander and caraway.

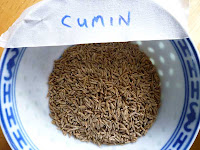
 The spices in this Brotgewürz

I found an online recipe that gives a recipe for a German bread spice (presumably for those who, like my wife, do not like caraway) at Germany's Recipe Wiki:
  • 10 tbsp whole cumin
  • 6 tbsp anise
  • 6 tbsp fennel seeds
  • 2 tbsp coriander seeds
Directions: Mix in a mortar with pestle, but not too fine.  Put the mixture into a glass jar in a dark place.  Incorporate into a dough at 5g per 1000g flour.

I did not have enough spices to make this as described.  I made it in the same ratios, but instead of using tablespoons, I made it with teaspoons.  This had a nice side-effect: once ground, it fits nicely in an old empty yeast jar.


The bread spice smells wonderful when you are crushing it in the mortar.  The next time I make this, I think that I am going to also include some dried papaya seeds.

The first thing I did was to calculate some of the values of this table.  These are huge amounts I am working with!  I was originally going to use all of my spent sourdough, both rye and whole wheat, using these ratios.  But it was not to be.

Ingredient ratio and overall% Rye amount Rye volume Whole Wheat amount Whole Wheat volume
Starter 1 parts (%) 466g -- 390g --
Flour 4.16 parts (%) 1939g -- 1622g --
Water 3.5 parts (%) 1631g -- 1365g --
Total Flour 100% 117g+1939g= 2056g -- 98g+1622g=1720g --
Salt 1.8% of flour's wt 37g- -- -31g --
ID Yeast 1% of total flour's wt 21g -- 17g --
Bread Spices 0.5% of total flour's wt 10g -- 9g --

I didn't have enough rye flour to make all of this, so I decided to cut it in half.  Even that looked like too much, so I cut it in half again.  Finally I had what looked like the amounts I'd need for one loaf.  And I decided that I won't make the whole wheat version this time, I'd just stick with the rye.

While fiddling with the table amounts, I encountered a little math problem that had me scratching my head for a while.  This recipe brought up a strange problem (for me) in Baker's Math.  Perhaps something like this has stopped other people too, so I'll reproduce it here in detail:


Baker's Math Problem:

You have a recipe that calls for a sourdough starter at 100% hydration.
You have a starter that is at 75% hydration.
You want to know how much flour is in the sourdough starter, so you can calculate the total amount of flour in the recipe (because that is what the other percentages in the recipe are going to be based on)
In my case, I knew only the total weight of the starter (117g), and its hydration (75%).  That 75% means that the water weight is 75% of the flour weight in the starter.  The flour in the starter is at 100%, obviously.  And the weight of the flour is going to be the weight of the starter less the weight of the water.

The key to answering this problem is realizing that the starter actually contains more than 100% of ingredients.  Always remember that the flour is 100%.  So to get the total percentages of weights in the starter, add the percentages to the flour: it will always be greater than 100%.  Bakers have to forget what they learned in school about the parts of the whole adding up to 100%.  Just remember that with baking bread, the whole is always greater than the parts!  You are creating something that contains more than 100%!  Always!

So in this starter, the total percentages of the weights is 175%.  How much of that is flour?  It is going to be the total weight minus the weight of the water.  The percentages are related to the weights.  So let's set this up as a ratio.  The only trick about setting up ratios is keeping what you are comparing on the same side of colon, for each side of the equal-sign.  I'll show you what I mean:

75% water : 175% starter  = x grams of water : 117grams starter

So this is (water to starter) on the left side of the equation, and (water to starter) on the right side.  Set up in this way, you can then cross multiply.

175x = 75 X 117
x = 8775 / 175

= 50g

So the amount of flour would be 117g - 50g = 67g

You can test this out now to see if 50 g is 75% of 67g, also using ratios.  Let's test for the weight of flour in grams, by calling that x.  Thus:


75% : 100% = 50 grams  : x grams
75x = 5000
x = 5000 / 75
= 67 grams.

Very simple once you have the key.  So let's generalize a formula for the flour:

waterWt = (hydration% X totalStarterWt) / (hydration%+100)

starterFlourWt = totalStarterWt - waterWt
 = totalStarterWt - ((hydration% X totalStarterWt) / (hydration% + 100))

I didn't have this formula in front of me for this experiment.  But I will have it the next time I try to make Mini's Rye, officially.

Here's what I did:


Making the dough:

I mixed up 117g starter, 485g rye flour, 408g water, 9g salt, 5g yeast, and 3g bread spice.  I didn't add the salt later, like Mini does. I just mixed it and it rested for 3 hours.   Then I folded it a couple of times and shaped with wet hands into an oblong and placed it in a basket.  There it rested for 4 hours.


Making the bread:

I preheated the oven and a casserole dish to 390 degrees F.  30 minutes later, I placed the dough inside the dish, splashed some yogurt on top, docked it with a fork, and baked for 25 minutes.  Then I removed the lid and baked another 25 mites (I figured that, because of the yogurt, I should add a longer bake than Mini suggested in her recipe).


While I was taking a picture of this bread for the blog, the cat jumped up on the table and walked over to see what I was doing.  I thought he was going to take a drink of water, but no, he was attracted to the bread.  He went over to the bread -- which smells marvelous, by the way -- and licked the top of the loaf, once, where the yogurt is, before I could get the camera down and shoosh him off the table.  The nerve of that cat.

The crumb is okay, nothing special, in fact it is very moist and although it tastes okay it could have used a slightly longer baking period, in my opinion.  But it tastes very interesting, with the bread spice.  I really like this.  I ate some of it this morning, side by side with an old piece of rye bread that is going stale, and I decided that I like the taste of rye by itself, but that this rye flavour, with bread spice, makes for a nice change.  It does change the whole character of a rye, slightly obscuring its bitter tones, but developing other personality traits.  I'm glad I made the bread spice, and of course, the bread -- even though the bread was kind of a flop because I didn't actually follow Mini's recipe.  I just needed a rye bread for work this weekend, and this recipe and my spent starter was at hand.


A bit misshapen, but a very interesting loaf

Notes to Myself
  • Docking it and then dumping yogurt on top may have a counter effect. In this bread there was no great rise seen, only a sagging and spreading. Was that due to the heavy yogurt on top of the bread that prevented the bread from rising?
  • The bread spices are actually quite nice, not too overpowering in this ratio. I think they do add something to the flavour. It is not something I would need all the time, but it is nice for a change. Wait and see if my wife likes it. She may not. I won't force her to try the bread this time, she gets cranky when I make her eat bread.
  • This loaf could have benefited from an even longer baking, in my opinion. The crumb looks okay, and is moist, but in rye crumb, some moisture tends toward gumminess. I am just basing this on the fact that the knife did not come out clean when I first cut it. It tastes okay, not gummy.
  • Harry the cat is attracted to the smell and the surface of this loaf. Keep it out of the reach of the cat.
  • Be more attentive to Mini's directions and amounts when you next go to make this bread.
  • I am not really sure why this simple bread math stumped me. My only explanation is that I was working on only 3 hours of sleep, in the flip-flop of going from working nights to days off. Get some sleep.

Wednesday, September 29, 2010

Reinhart's Whole Wheat Anadama Bread


Reinhart's Whole Wheat Anadama Bread

After trialing a few other Anadama loaves recently (Beard's, an Anadama experiment of my own, HBin5's), it was finally time to give Reinhart's Anadama recipe a try.

In addition to Reinhart's Anadama with cornmeal, I have also baked a loaf with corn flour.   All other ingredients and steps are the same.

The difference between Corn Meal (Left) and Corn Flour (Right)

Corn Flour
I picked up a bag of Maseca Corn Flour from a local supermarket, out of curiosity.  This corn flour was imported from Texas, and it is called an "instant corn masa mix".  'Masa' is just Spanish for 'dough', but it usually means 'cornmeal dough', and the cornmeal flour is used to make tortillas, tamales, pupusas, empanadas, corditas, arepas and sopes, all Mexican breads or dishes made with cornmeal or cornflour breads.


One of the customers who reviewed this flour for Amazon says you can't use it like other corn flour, it is only good for these Mexican flatbreads and dishes, but they didn't say why.  Why can't I use it in bread?  If I use it in an Anadama recipe, why will I fail?  I had all these questions.  I wanted to know. 

I was about to find out.

I generally have concerns about corn, because it is one of the grains that is grown using transgenic technologies.  Let me be clear: some corn is.  And how can I be sure that this corn is not modified by the latest gene splicing technologies?  In fact, I can't.  It doesn't specifically say that they do not use transgenic corn; and it doesn't say that the corn they select is organically grown.  It may have been grown using atrazine or other herbicides.  But I guess I was convinced (?stroked) by several reviews and by their online presentation.  By all accounts, I have here a quality product.

The bag of flour I purchased has a symbol on it to state that it is gluten free; and another symbol indicates that it is kosher.  The nutritive facts table gives the fat at 2%, the carbohydrates at 8%, the fiber at 8%, and the calcium and iron at 2% each.

The only ingredient listed is "selected corn treated with lime". I became curious about this added lime, and have been slowly educating myself.

Lime
Most people are aware that corn was a grain that was widely used throughout the Americas, and that it was taken back to Europe shortly after the new world was discovered.  There, it quickly found favour.  Of all the grains that are grown, corn seems to have the best ratio of yield to square footage required (1 bushel of this grain can be grown in 500 square feet, whereas a bushel of wheat requires about 1000 square feet, rye about 1500 square feet. [source: Emery, The Encyclopedia of Country Living (2003)]).  Landlords could suddenly feed their peasant tenants for less, thus seeing more profit.  But the sudden dependence on corn as a staple caused many poor people to develop pellagra.  In fact, our word from that disease comes from north Italy (Pelle Agra means 'sour skin', and is descriptive of one of the symptoms of the disease), where, presumably, they ate a lot of Polenta (that's what they call corn mush in Italian).  Soon, corn was regarded with suspicion.  Some even believed it contained a toxin, but it could never be proved. Eventually, conventional folk wisdom said that corn was acceptable to feed to pigs and chickens, but it was not grown for humans.  This is why we don't find, for example, too many German breads made with corn.  I would be hard pressed to find an authentic German Maisbrot or a bread similar to an Anadama.  Was der Bauer nicht kennt, das frisst er nicht.  Acceptance of corn in the diet in Europe came slowly, as more was learned about how the native Americans used it.

It turns out that corn, while being very nutritious, is by itself incomplete when it comes to providing enough vitamin B3, or Niacin.  The natives of the Americas generally prepared their corn with lime.  To loosen the husk, they would soak it in heated water with some ash or some limestone.  A simple rinsing then washes away the husk and the lime water; but the process has the added benefit of making the niacin in the corn bioavailable.

The Europeans and the Americans of the southeastern U.S. had to learn this the hard way.  Hundreds of thousands of people died in the early part of the twentieth century of pellagra.  Finally, vitamin B3 was found to be the key.  So in 1942, the U.S. Government mandated that Niacin be added to white flour, thereby preventing a large number of deaths due to pellagra.  Most of these deaths had been occurring in the southeastern U.S., where a lot of grits were consumed.  Grits is a porridge made from ground corn.  It is healthier when made from hominy, which is corn kernels that have been treated with an alkali like lime - and this is apparently how the First Nations people ate it.

Why put niacin in flour, though, which is made from wheat?  Well, it turns out that a deficiency of lysine can also cause pellagra.  And lysine is the one amino acid that you don't get enough of, if you are eating a lot of wheat bread.

So what kind of lime is added to corn flour?  Probably because of the green and yellow picture of a cob on the bag of corn flour I purchased, I was picturing in my mind some green, lemon-shaped, citrus fruit.  Nah-uh. 


Lime is our name for Calcium Hydroxide (Ca(OH)2); this is an inorganic compound, made from heating limestone (calcium carbonate) in water (a process called Nixtamalization). 

Calcium Hydroxide is commonly used in building, as ingredients in plaster and mortar.  But it has also been used forever in food processing.  Practically Edible has a good article on lime and its use in food.


Comparing Reinhart's Cornmeal Bread to the Bread made with Corn Flour
I think that the soaker using the corn flour could have used more water.  It seemed a lot dryer; the corn meal must not soak up as much water as the much finer corn flour does. However, I kept the same hydration for each.  I think it shows in the finished loaves: the official cornmeal loaf was bigger.


The Soakers are left at room temperature 24 hours


The Bigas were identical in ingredients.

 The Bigas are refrigerated 8 hours


I mixed the Official Reinhart Anadama dough first, and my experimental corn flour dough second.


Final Dough ingredients

Both of these doughs formed magically during the 3-4 minutes of kneading.  I am always amazed at the way these Reinhart doughs (from his book Whole Grain Breads) come together under your hands, when they have been mixed and then kneaded for 3-4 minutes.   Never have I been more amazed to see how it worked, than for this whole wheat bread with cornmeal.  The texture feels interesting, and it becomes a bread dough out of ingredients you wouldn't believe would become bread dough, in a matter of seconds, as if by magic.

The Cornmeal Dough

The Cornflour dough

My bigas were only out of the refrigerator about an hour and 10 minutes.  And you know what?  I think that actually made working with the dough by hand a lot easier.  The heat in your hands will change the consistency of the dough as you work with it, and frankly, I don't think it is always for the better.  If it is cool, it will likely take longer for the yeast to get to work, sure.  But if it remains cooler, it seems to retain its structure better, and makes it easier to work.  So we are experiencing a trade-off here.

The smell of molasses predominates as you squoosh the dough together through your fingers like mud pies when you were a kid.  Remember?

After the first rising, the dough made with Cornmeal (the one that followed the official Reinhart recipe) was spreading a bit more.  It was gooier, sagged more, and the gluten seamed to tear more easily at the surface. The one with the Cornflour was tight.  Again, this was probably entirely due to the hydration.  The corn flour could have used a bit more water.


 I folded them into a loaf tin as the recipe required, and baked them both at the same time.

This is supposed to change the texture of the crust

After I took them from the oven, I rubbed some butter on the one made with the corn flour, to see what that might do to the crust.  I read that somewhere, elsewhere.

Reinhart's Anadama Bread, and a version made with Corn Flour instead of Corn Meal

The next morning, my wife agreed to have a slice of one of the loaves.  I cut them both for picture-taking purposes, but didn't taste them myself for a few hours, because I was having some bloodwork drawn, and was not eating until after that (nothing serious, but we have a new doctor and she wants a baseline of data)She opted to taste the official Reinhart Anadama, simply because it was closer to her, not because it had a greater appeal. 

She toasted it and ate it with butter and honey.  Her verdict was that it was gritty in texture (due to the cornmeal) and yet delicate -- meaning, it felt like it might fall apart, but it didn't.  "It was pretty sweet too," she said, "and I'm sure it would have been sweet even without the honey."  But, she concluded, "it tastes okay."  Said with a shrug, that is a reluctant good review.

I could not convince her to do a real taste test.  She was simply not hungry after eating the first slice.  Under duress, she agreed to toast the second slice and take a bite.  "What's the difference?" she wanted to know as it toasted.

"This one should not be as gritty," I offered by way of explanation.

Dutifully she toasted it up and put honey on it as she had done before.  I was hoping that, after one small bite, she might be enticed to eat the whole slice.  But it was not to be.
The cornflour bread, made Anadama-style, is not an Anadama bread but an experiment

She turned to me and actually spat the lump of dough from her mouth to her hand.  "It turns into this lump of mush in your mouth," she said, shaking her head.  "If this were served in a restaurant, people would say, "what is that?  Why does it taste like that?  It looks like it is cooked, but something is wrong.'"

She concluded, "The cornmeal bread is still better."

We were preserving some grape juice yesterday, and it has stained this bread board a lovely purple.

When I finally did come to eat both of the breads, I could detect no real difference other than the texture or mouth feel.  To me, they both taste okay.

But I say that with a shrug.

Notes to Myself
  • If you fortify flour with Niacin, why doesn't baking with it destroy the vitamin?  If you add Niacin to your dough that is not so fortified, what will happen?
  • Use a bit more water if you use cornflour instead of cornmeal for your soaker, for loaves using this recipe.
  • But I think we can conclude, from this experiment, that you won't be using corn flour for Anadama bread any more.  Stick with the cornmeal.  There is a reason why cornmeal and not corn flour is used.

Sunday, September 26, 2010

A Granola Bar made without baking


Granola Bar Made without Baking

This recipe follows the one given by the blogger of Joyful Abode.  She seems to have more recently gone grain-free, but this granola bar of hers remains popular to readers and googlers, and I decided to try it out.  Of course, I have changed some things, but the basic ideas remain the same.

My Ingredients

Ingredients
  • 2 c Oats 200g
  • 3/4 c Wheat Germ 71g
  • 3/4 c Pepitas 94g
  • 1/2 c Almonds 73g
  • 1/2 c Hazelnuts 67g
  • 4 Tbsp Unsalted Butter 56g
  • 2/3 c Brown Sugar 155g
  • 1/2 c Honey 168g
  • 2 tsp Vanilla 12g
  • 1/2 tsp Kosher Salt <1g
  • 1/2 c Flaxseeds 76g
  • 2 eggs
  • 8oz Dried Fruit: 227g
  • Dried Apples 50g
  • Dried Pears 27g
  • Dried Papaya 25g
  • Raisins 50g
  • Dates 25g
  • Missing: 50g

Method

  • Preheat oven to 400 degrees F.
  • Toast the oats, seeds, wheat germ for 10 minutes, stirring occasionally (this is mostly to get them warm rather than roast them). Don't roast the nuts.


    Grains to Roast
  • Chop the nuts to a coarse consistency.  I put them in a plastic bag and hit them with the side of a meat tenderizer to break them into chunks.


     Nuts coarsely chopped
  • Line a glass baking dish with oven spray and waxed paper.  I sprayed the paper too, but I probably didn't need to.
  • Chop your dried fruit into manageable sized pieces, if necessary (raisin sized pieces are okay)


    Dried Fruits

  • In a pot on the stovetop, bring to a simmer the sugar, honey, butter, vanilla and egg.  Don't get this boiling, but stir frequently until everything is smooth.


     Liquid Simmered

  • Turn off the oven, and dump the oat-seed mixture into a large bowl and pour the warm liquid over it, mixing everything thoroughly.
  • Pour this into the prepared glass baking dish, sprinkle the crushed nuts on top and press down hard with some more wax paper.


    Mix it all up and pour it into a flat glass pan


    Press it all down really really hard while warm

  • Let cool 2-3 hours and cut into granola sized pieces.  Put into a container and put into the freezer, taking some out as required for work-lunches.


     Sorry but you have to eat the crumbs

What's different in my version.

I have eggs.
I added flax seeds and took out 50g of dried fruit
I took her advice and added the nuts to the top later, and didn't roast them.

Results
The one thing I really like about this recipe is the way it gets pressed down.  That seems to be an excellent idea.  I wonder if it might help to put some weight on it, too, while it is cooling?  Like another stackable glass bowl, with something heavy in it?

I cut this after 2 hours.  It was still very very gooey.  And it did not stick together very well.  I immediately put it in the freezer, as I have been doing.  But I ate the crumbs, and one tiny slice.

So how did it taste?

Awful.

To be fair to the blogger who originated this recipe, I changed a lot.  For one thing, I used buckwheat honey, which is far too overpowering for this granola bar.  But the main trouble was the amount of honey, not the type of honey.  It was far too sweet and sticky.  It was so sweet, I would say the honey should be cut not in half, but in 1/4 or even less.  Yes, it was that bad.

What else I'd change next:

I'd include more grains, like
  • sesame seeds
  • millet
  • amaranth
  • quinoa
  • rye berries
  • wheat berries
I'd also try
  • sunflower seeds (she had this one, but I had run out, so I used pumpkin seeds)
  • pistachio nuts instead of hazelnuts
  • coconut on top with or in place of the nuts
  • less fruit, especially no raisins (they are too sweet for this)
I wonder if a ten-minute stirring of some of these seeds and grains atop the stove in a bit of water until they release their starches and gums and became somewhat gluey might go well with her technique, instead of using so much honey, which is too sweet for my taste.

But most importantly, I'd try

  • 1/8 c honey
  • 1/3 c brown sugar


Notes to Myself
  • Try these changes to this recipe if you ever try this again.  Amounts, I am just guessing at.
  • Seeds & Grains to roast 10-12 minutes in the oven @ 400 F:
    • 2 c Oats
    • 3/4 c Wheat Germ
    • 3/4 c Sunflower Seeds
    • 3/4 c Pumpkin Seeds
    • 1/2 c Amaranth
    • 1/2 c Sesame Seeds
  • Seeds & Grains to boil on stovetop 10-12 minutes:
    • 1/2 c Wheat Berries
    • 1/2 c Rye Berries
    • 1/2 c Quinoa
    • 1/2 c Millet
    • 1 1/2 c Water to boil away and/or swell the seeds & grains
  • Other Liquid to simmer on stovetop 10-12 minutes:
    • 2 eggs
    • 1/8 c honey
    • 1/3 c brown sugar
    • 4 T butter
  • Fruits to stir into Seeds, Grains, and Liquid before pouring into glass container:
    • 25g Dried Apples
    • 25g Dried Papaya
    • 25g Dried Currants
    • 25g Dried Apricots
    • 25g Dried Cranberries
  • Nuts to press into the top:
    • 1 1/2 c Pistachio nuts