All grains contain peptides that mimic morphine or endogenous opioid substances. This is where I deal with my latest loaf craving. Get your bread-based exorphin fix here.

Thursday, October 14, 2010

Laurel's Kitchen Loaf for Learning: Comparing whole wheat flours


Laurel's Kitchen "Learning Loaf" 
A comparison between purchased whole wheat flour, and grind-your-own whole wheat flour

Every time I have a day off and some time to bake some bread, I begin to feel like an evil scientist.  Yes, every time I bake it is an experiment.  Yes, I say 'evil scientist' because every time I begin gathering ingredients, I feel like I have to sneak around like Dr. Frankenstein digging up dead bodies.  My wife will come into the kitchen when I have lots of things strewn about and make me feel as pernicious as a vivisectionist.

Today's experiment, however, was anything but evil.  Sure, I made an awful mess, and that makes me feel evil when she gets that look on her face.  But I cleaned (most of) it up as I went.  The main object of today's experiment was to test the recipe of Laurel's Kitchen Bread Book's "Learning Loaf".  I baked 2 loaves with this recipe today, changing but one ingredient: the flour.

The first dough was made with Whole Wheat Flour freshly purchased at Arva Flour Mills.  The second dough was made with flour that was freshly ground using my Country Living Grain Mill.  The object in making these loaves side by side was not to see how the dough performed, necessarily, but to see if there was any quantitative or qualitative difference in taste between the two loaves.

The lengthly instructions for this "Learning Loaf" are the best I have ever seen.  They describe many details of the loaf's various rising stages in detail, and give reasons behind the observed phenomenon that can be expected.  No where else have I seen such rational explanations; and so, many of these steps have been omitted by me in the past.  Things like the second rise: "why bother?" has always been my motto (even when I have done it).  Now I have an understanding of why we do it, and how the gluten in the whole wheat can further develop using periods of deflation and rests.

It is a lengthy procedure, however, and I definitely spent the better part of the day following these instructions as best as I was able (and carefully documenting the loaves as I made them, with a very gooey camera).

0. Gathering the Ingredients
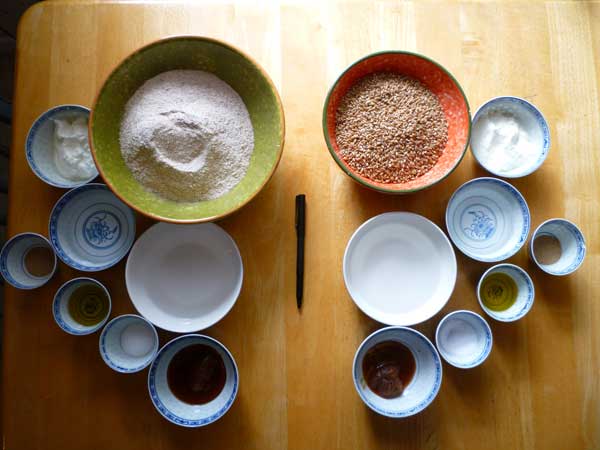
 

I measured my ingredients by grams; the Laurel's Kitchen book gives wet ingredients by ml's, which is close but not entirely the same as the weight.  My scale doesn't do half-grams.  Thus I gathered:
  • 95g Warm Water
  • 4g Yeast
  • 450g Whole Wheat Flour (or 450g whole wheat berries, which gave me 444g of whole wheat flour)
  • 6g salt (Kosher salt is bigger granules, I guess, so this was almost 2 tsp)
  • 80g cold yogurt
  • 152g hot tap water
  • 25g olive oil
  • 37g buckwheat honey
Note that 2 cups of whole wheat berries gave me 428g, which is darn close to the 450g needed in flour.  I just added a bit more to bring it up to weight, and then milled it. Milling it, I lost about 6g of weight, which is not bad, I think.


1. Preparing the Yeast


A substantial difference between the two loaves was, the second loaf (with my home-ground whole wheat, or HGWW), the yeast sat longer and was definitely more activated when I went to make the dough.


2. Mixing the Ingredients


Wet ingredients are added to dry ingredients.

3. Adjusting the Consistency

The dough is to be touched and manipulated, and the Learning Loaf has specific instructions on how the dough must feel.  Nothing will substitute for experiencing the dough.  I made no adjustments to this, my first Learning Loaf.


4. Kneading the Dough


The dough is pretty sticky, when you are kneading it.  I would sometimes dip my hands into water to keep the dough from sticking to them.  I didn't count how many times I kneaded the first dough, I just set the timer for 10 minutes.  The second dough I did count, and I kneaded 319 times in those 10 minutes -- pretty close to the number that the book suggests.  Still, I just don't get the windowpane test.  The dough always tears when you stretch it.  It never achieves a silkiness that all-purpose or bread dough will.

5. Letting it Rise: I


Once I had this first dough to the point where I could let it rise, I went back and performed the same steps for the other dough, the one with my HGWW.

HGWW Mixing: note the yeast is a lot frothier!
HGWW mixes up easier: better hydrated?
HGWW feels different, difficult to explain
HGWW starts off seemingly wetter, for kneading
HGWW still a bit sticky when 10 minutes of kneading is done, but it is tighter
HGWW at the start of the first rise

At this point, the two doughs are at roughly the same stage, and I put them both in the Excalibur Dehydrator, covered, for 1 1/2 hours at about 80 degrees F.   They rose nicely in that time, and both passed the finger-poke test.

6. Deflating

I gently deflated them and turned them once upon themselves.  Not sure if I did this part correctly: was I supposed to turn the entire dough ball over?  I just folded it, thereby stretching the deflated dough's gluten some more.


After the first rise

The finger is wetted and poked into the dough
It stays indented
So the dough is then gently deflated and folded over


HGWW passes the poke test
HGWW is gently deflated and folded upon itself

7. Letting it Rise II

This second rise is supposed to take place at twice the speed of the previous rise.  I set the timer for 45 minutes, and checked the dough in the Excalibur Dehydrator at that time.  Once again, the doughs had risen nicely, and passed the poke test.


8. Rounding

I get the impression that this stage, so vaguely similar to shaping, is often missed.  And I believe that it is not so much the tightening of the dough that is so important here, but the stretching and relaxing of the dough.  It is supposed to sit under a bowl for 10 minutes here, relaxing.  I think that I inadvertently skipped this step, or didn't allow the dough to relax quite long enough.  Oh well, I'm learning.  Next time I'll do it right.

9. Shaping


The first dough is shaped and placed in the prepared pan

The HGWW is shaped and placed into a pan

10. Proofing

This is the tricky stage where you have to preheat your oven when the dough is precisely ready to be added to the oven, and who really knows in advance when that will be?  I followed the recipe here, and set the timer to 12 minutes, preheated the oven, and then in another 13 or 14 minutes, I expected the loaves to be ready to bake.

Notice the slight difference in textures here between the loaves.  Is the one on the left overproofed?

11. Baking

For some reason, the scoring of the loaf on the left caused a terrible drag mark,
and the loaf deflated horribly.

The loaves baked up to a nice colour.  The HGWW loaf on the right had more oven spring.

12. Is it done?

Yes.  But the one on the left had to be persuaded from the tin, the HGWW loaf on the right toppled out on its own when the tray was inverted.  They both have a rich dark brown crust.

13. Looking at your loaf


The loaves were cut at breakfast the next day.  Perhaps surprisingly, the loaf on the left had an airier crumb, perhaps because it had been left about 10 minutes longer than the HGWW loaf on the right. Despite the fact that the loaf on the left looks deflated, neither one achieved any true oven spring, based on what the crumb looks like.

But what about the taste? This whole experiment was supposed to be about taste, to see whether the HGWW loaf has any appreciable difference in taste.

There are differences, but the differences are very subtle. the HGWW loaf is mildly nuttier, cleaner tasting. The crust of the loaf on the left is slightly staler: it has a denser texture, a tougher coat, an ever-so-slightly more bitter finish.

It occurs to me that bread bakers lack the distinct vocabulary of wine and beer connoisseurs. One really has to be careful when judging taste that one doesn't merely judge mouth-feel.

Overall, the loaves taste nearly the same. I do not taste rancidity in either loaf.


In my opinion, both of these loaves became stale very quickly.  These loaves must be eaten in 2 days, I should say.  On the third day, they were distinctly crustier throughout.

Notes to Myself
  • Don't forget to Round your loaves after the second proofing: gently tug on their surfaces to tighten them, elongate them, and then let them relax ten minutes or so under an inverted bowl BEFORE shaping them.
  • Be careful you don't overproof your loaves.
  • Make sure the yeast is frothy before you add it to the flour mixtures.
  • More thoughts later when the taste results are in.

Wednesday, October 13, 2010

Stone-Buhr Bars


Whole Wheat Bars

This recipe comes from the Stone-Buhr Milling Company of Seattle Washington.  It is frequently referred to as the "Stone Buhr Bar" or "Stone Buhr Energy Bar".  This is the official page where the recipe can be found (although many others have duplicated it).

I was hoping that this would be a great whole wheat granola bar.  Unfortunately, the way I made it, it is simply a dessert bar, similar in consistency to a date bar, although perhaps not so sweet.  To become a granola bar, it probably could have used a lot more seeds, and nuts, and grains, and maybe an egg to hold it all together.  And I really think that it should have been cooked longer.

I should hasten to add that I've made something a little bit different, so I can't really comment on the actual bars as they would have been had I followed the recipe to a T. 


What's Different?
Not having access to the Stone-Buhr whole wheat, I have used some whole wheat from our local Arva Flour Mill.  And I have made other substitutions as well.  The original calls for whole uncooked oats, and I couldn't find any; so I have used rolled oats.  And the actual recipe asks for apple juice, and I didn't have any of that, either.  So what I used was some apple jelly that we made recently that for some reason never set properly, and was mostly liquid.  Instead of chocolate chips, here I am using up some peanut butter chips that were in our cupboard (rather than open a new package of chocolate chips).  I think I got all the other ingredients right; although I should add that the coconut I used was some coconut that we had shredded ourselves recently.  It probably has a slightly different texture than the stuff you buy in the stores.

I weighed my ingredients as I went; as usual, your mileage may vary:
  • Peanut butter 164g
  • Whole Wheat Flour 157g
  • Wheat Germ 24g
  • Shredded Coconut 44g
  • Sesame Seeds 32g
  • Rolled Oats 98g
  • 2 Ripe Bananas - 435g with skins on, 297g with skins off
  • Too Wet Apple Jelly - 139g
  • Peanut Butter Chips -- 80g
  • Raisins - 33g


The dry ingredients are combined, and the wet ingredients are combined separately.  The wet ingredients are mixed until smooth, and then the dry ingredients (except raisins and chips) are added until the mixture is all mixed together.  I used beaters.


The raisins and the chips are folded in right at the end.

Then it is put in a 9x9 dish and baked in a preheated 350 degree F oven for 25 minutes (though as I said, it should have been longer).

It was far too gooey to cut into granola-bar sized pieces so I opted to cut it into brownie-sized pieces.

As my wife said, "It's just a bar.  And there are a million and one recipes for bars."

This one was nothing special.  But it will give me something to take for lunches, if I remember.


Notes to Myself
  • Try baking for 35-40 minutes.
  • This would definitely taste better if you had chocolate chips. And some nuts.
  • What if you, like, made a bread dough that would encase this goo?
  • Next time you try this, try these quantities: 
    • 3/4 c Peanut Butter
    • 1 c Whole Wheat Flour
    • 1/4 c Wheat Germ
    • 1 c Unsweetened Coconut
    • 1/4 c Sesame Seeds
    • 1 c Rolled Oats
    • 2 Ripe Bananas
    • 1/2 c Too-wet Apple Jelly
    • 1/2 c Chocolate Chips
    • 1/4 c Raisins
    • And what else?
    • 1 egg
    • 1/4 c crushed almonds
    • 1/4 c cracked wheat
      After making the recipe as it was before, try combining an egg, and the almonds and cracked wheat and maybe some more whole wheat and some more apple juice and make a pasty dough. Spread this over the top of the bar mixture and press it down.

Sunday, October 10, 2010

Spent sourdough Rye and Whole Wheat bread with boiled seeds and Rye Meal egg wash

Latest Sourdough Experiment

This is another experimental loaf, using my old sourdough discard.  This is the same as the last one, in terms of being 50% rye and whole wheat flours, with a similar ratio in sourdough starters.  This time the only variations are: (a) I have added some boiled grains, and (b) I have used an egg wash on top, using some rye meal, and (c) I baked it at 350 degrees F. for an hour (along with the raisin bread I made yesterday), and gave it an extra 10 minutes at the end at 425 degrees F, and (d) I remembered to dock it with a fork before baking this time, and (e) I doubled up on the bread spice.

I'm still using this basic baker's formula, although here I've bumped up the bread spice to 10g, and I've added some boiled grains:
  • Starter 92.7%
  • Flour 100%
  • ID Yeast 1%
  • Salt 1.5%
  • Water 85.4%
  • Bread Spice: 10g, or 1.4%
  • Rye Berries: 1/4 c, 42g, or 5.9%
  • Red Quinoa Seeds: 1/4 c, 45 g, or 6.4%
  • Cracked Wheat: 1/4 c, 25 g, or 3.5%
  • Water to boil these grains: (equal amount as grains) 112g, or 15.8%
The water used to boil the grains gets absorbed or boils away in 5 minutes, so I wouldn't add it to the hydration, necessarily.

The dough gets mixed up easily by spoon or spatula.  What I do is, I measure the starter (my starter is a 75% hydration), then figure out the other ingredients from that.  I don't care if I have more rye starter than whole wheat starter, the object is just to use up what I have, rather than discarding it.  This time I had more whole wheat starter than rye starter, but I didn't separately measure them.

Weigh the starter, and figure out the amount of flour and water etc you need.
Then add the water to the starter and mix thoroughly.

The sourdough starter gets hydrated in the water, and mixed thoroughly.  Then I add the other ingredients and mix those up.

The flours: 50:50 whole wheat and rye

Salt and Yeast

I increased the amount of bread spice this time because these loaves weigh a lot.  Last time I used 5 g, and it didn't seem like it was enough.  This time I used 10g.  Even though the ratio of bread spice required is supposed to be only 5 g per 1000 g flour, and we have only 708 g of flour, remember: there is also a lot of flour in the starter (375 g), and the total weight of these dense loaves is over 2 kg.  Have I used too much bread spice?  We shall see.

The grains boil quickly, and have to be stirred frequently.  It takes about 5 minutes.  I think that I might not have had enough water to boil them.  Maybe an overnight soak might be better, who knows?

Use what you have: some rye berries, red quinoa, cracked wheat, 1/4 c each

Cool the boiled grains slightly and add to the flours

The dough mixes easily with a spoon or spatula, it is so wet.  Just make sure that it all gets hydrated.


Once it is mixed, just squish it into a tin, and pat it down.  You'll want to let it rest (it doesn't really rise much, but it does fluffy itself a bit).  Once it has risen, you can make an egg wash, and mix some rye meal with it and spread it on top.  My dough had risen to the top of the container, so some egg wash fell off, especially in the oven during the bake.


Risen dough

Egg wash with rye meal

I think that the egg wash and rye meal on top gave this bread a very pretty golden colour, once baked.


This bread tastes mildly sour, and has a nice scent to it -- the bread spice is prevalent but not overpowering.  The grains were a nice touch, and give it texture and flavour.  Not a bad bread, if you can tolerate dense loaves.  Personally, I like it.  But I recognize it may not be for everyone. 


Notes to Myself
  • This still needs fresher sourdough, not spent sourdough.
  • My wife says that the Anise is a bit overpowering.  I guess I should tone down the bread spice a bit.
  • I love the texture of this loaf.